iDock

iSteve

R.I.P STEVE JOBS 1955-FOREVER [PHYSICALLY GONE, MENTALLY STAYED.] THANK YOU STEVE FOR BRINGING THOSE GENIUS iDEVICES AND TURNING THE WORLD INTO THE COLORFUL GLOBE AND YOU'RE FOREVER MISSED.

Tuesday, December 20, 2011

The right way to install Mac OS X Lion.

OS X Lion

The process of upgrade from Snow leopard to Lion cause so many troubles to some users which raised their comment on the blog about the lion performance, battery draining, super hot mac book with lion upgraded.

Actually and definitely we have a solution to get lion installed without any hassle, as following :


  1. Insert the Lion installation DVD 
  2. Reboot the Mac
  3. At startup press c to boot from the DVD reader
  4. Launch Disk Utility
  5. Erase the hard drive where Snow Leopard is installed
  6. Quit Disk Utility and continue with the installation of OS X Lion
  7. After Lion is installed let it finish indexing your hard-drive. Don’t install any 3rd party software or migrate your data.
  8. Install all the latest updates (10.7.1, iTunes etc.)
  9. Restart your Mac
NORMALLY YOUR BATTERY SHOULD BE IN GOOD PROPER WAY OF USING,
IF THE BATTERY STILL DRAINING FAST THEN CONTINUE THESE FOLLOWING STEPS:
  1. At startup press the Option key to select the drive to boot from
  2. Select the Lion Recovery Partition
  3. Launch Disk Utility and repair permissions on the disk where you’ve installed Lion
  4. Quit and restart your Mac by pressing Command + Option + P + R. This will reset your PRAM
  5. Start installing your applications and restore your data

In addition to that I also:

a. Set Dashboard not to show as a Space
b. Disabled the automatic restore of windows when reopening applications

Friday, December 16, 2011

FIX Battery draining after updated to Mac OS X Lion

I hace noticed that the battery performance of my macbook draining after upgrade to Mac Os Lion,

I have searched and exploring on the cloud to find the root of the issue, many folks post about this issue on the internet that their macbook is getting slow, battery draining and getting so hot !!!!

finally i have collected few solutions for the above issues which is instructed as following :


. Disabling Spotlight :
Launch Terminal and type the following:sudo nano /etc/hostconfig
Navigate using the arrow keys down the following entry:SPOTLIGHT=-YES-
ChangeSPOTLIGHT=-YES-toSPOTLIGHT=-NO-
Save /etc/hostconfig by hitting Control-O and the return key, next hit Control-X to exit the nano editor
Next, you’ll want to disable the index by typing the following in the Terminal:
mdutil -i off /
And to erase the current Spotlight index, type:mdutil -E /
That’s pretty much it, on your next reboot, Spotlight will be completely disabled.


. Reset Power Manager :
1. Turn off the computer.
2. Hold down Ctrl+Option+shift
3. While holding down these button, press and hold the power button as well.
4. Hold all buttons for at least ten seconds.
5. power back on the computer.

Friday, December 9, 2011

[Crack] CallBar 1.0-3


Update : Version 1.0-3 released ! Crack is out !!

v1.0-3
- Fixed a crash issue when "Led Flash on Alerts" option was enabled in Accessibility on iOS5
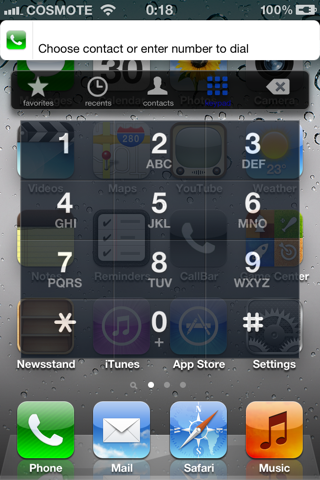
- Added Voicemail button on the Dialer Interface
- Fixed custom ringtones playing texttones if a custom texttone for the contact was selected.
- Added support for custom vibration patterns.
- Improved dialer's Favorites and Recents UI.
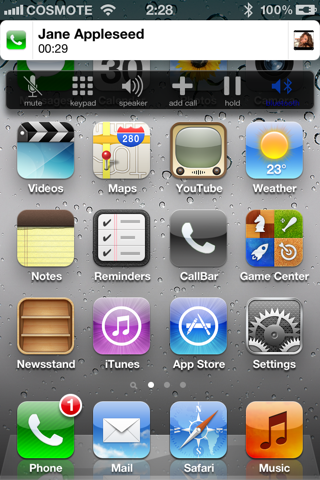
- Added ability to see the numbers dialed when in a call.
- Phone numbers now appear with localized format.
- Added ability to tap the status bar to scroll on top into dialer's tables
- Passing through status bar touches when CallBar is visible, for several gestures compatibility.
- The package now doesn't depend on Activator, its optional

Changes made on 1.0:
- Added option to answer telephony calls in-place
- Added methods and UI for handling telephony calls in-place
- Added dial-out option using callbar (Assign an activator action to bring down callbar and dial a new number)
- Removed answer-decline buttons, you now answer by swiping right and decline by swiping left on callbar.
- Added tap to show/hide in-call buttons. Tap callbar while in an active call to trigger.
- Added tap to open related call application. Tap the application icon on the left.
- Removed silence button, you now silence the call using the sleep button. (as for native calls)
- Added dial-out buttons : Favorites, Recents, Contacts, Keypad
- Added the following call management buttons: Mute , Speaker , Add Call, Keypad , Bluetooth , Hold Call, Swap Calls, Merge Calls.
- Callbar is now aware of a second incoming call and allows call-swapping/merging.
- The keypad can be used for both sending DTMF tones while in a call or dialing out a number when idle.
- Fixed several bugs.
- Improved memory usage.
- Removed methods for ringing applications (Anyring, ToneFXs etc) . We now provide an API for developers for this.
- Improved UI and graphics experience
- Added application for managing settings.
Download 1.0-3 Cracked : Official

Don't let incoming phone or FaceTime calls interrupt what you're doing on your device any longer. CallBar re-designs the incoming phone and video call interface to allow you to use your device while it's ringing. Choose to answer, decline, or even dismiss the incoming call depending on your choice.
Upon dismissal, the bar will shrink and cover the status bar - a safeguard just in case you choose to pick up the call after all or you accidentally dismissed. You can answer or decline the call from this dismiss view also. Dismissing the call silences the ring or vibrate, which is done by tapping the banner, hitting the Power button, or pressing the Volume buttons. To re-enable the ring or vibrate, simply tap the banner to bring the banner back up. All the above functionalities are available from the SpringBoard, within any application, and on the lockscreen. You could be texting, updating Twitter, surfing the web, or in the middle of using any application - CallBar allows you to continue what you are doing without interruption and gives you the option to handle the situation with ease.

* Compatible for both phone and FaceTime video calls
* Supports all iDevices on all firmwares 4.0+ (including iOS 5 betas - will support full version upon release)
* Settings for CallBar can be found in the Settings.app (excludes iOS 5 beta users - iOS 5 full version will support Settings)

CallBar User Guide - use it as a tool to help you become familiar with the different gestures, actions, buttons, and settings of CallBar.